Tips for Making Your RV Bedroom Cozy & Comfy + Lucid Mattress Review

Tips for Making Your RV Bedroom Cozy & Comfy + Lucid Mattress Review

RV Bedroom | If you’re reading this, you’re wondering how you can make your RV Bed a place that you enjoy laying down and falling asleep in.

After all, camping doesn’t always have to be roughing it. RV camping adds a special touch of luxury while enjoying the great outdoors.

So, let’s imagine for a moment that you’ve been hiking all day and all you want to do is lay down in a nice comfortable, and cozy bed. However, you lay down in your RV bed and it’s like you’re lying on a flat rock?

That doesn’t sound enjoyable to me and that’s what RV mattresses are like.

RV mattress review

We know firsthand that the mattresses that come standard in RV’s (unless you have it custom ordered) are far from being comfortable.

For us, the Mattress that came in our RV was the most uncomfortable mattress I’ve ever slept on. So, since we were going to be living full-time in our RV, getting a new mattress and making our bed comfy was a necessity.

Whether you plan on living full-time or enjoying your RV during the RV season, being able to relax comfortable is a necessity.

So here are some tips to get your RV bedroom ready for a comfortable night’s sleep.

1. Buy a Comfortable RV Mattress (LUCID RV Mattress Review)

The first thing you want to do in making your RV’s bed comfy and cozy is to check the quality of your mattress.

As I mention, RV mattresses are usually horrible to sleep on and made with cheap material. We slept on our mattress the first night we got our RV. It was the worst sleep I have ever had. Therefore, purchasing a new mattress was at the top of our list.

Side Note: At the beginning, we tried memory foam mattress toppers, but with the quality of the mattress, it began to sink in the middle and made it so uncomfortable.

So, we searched throughout the internet because we had to one that was an RV Short Queen to fit. These are hard to find at a good price and there are not many options to choose from.

We also didn’t want a spring mattress and always enjoyed memory foam.

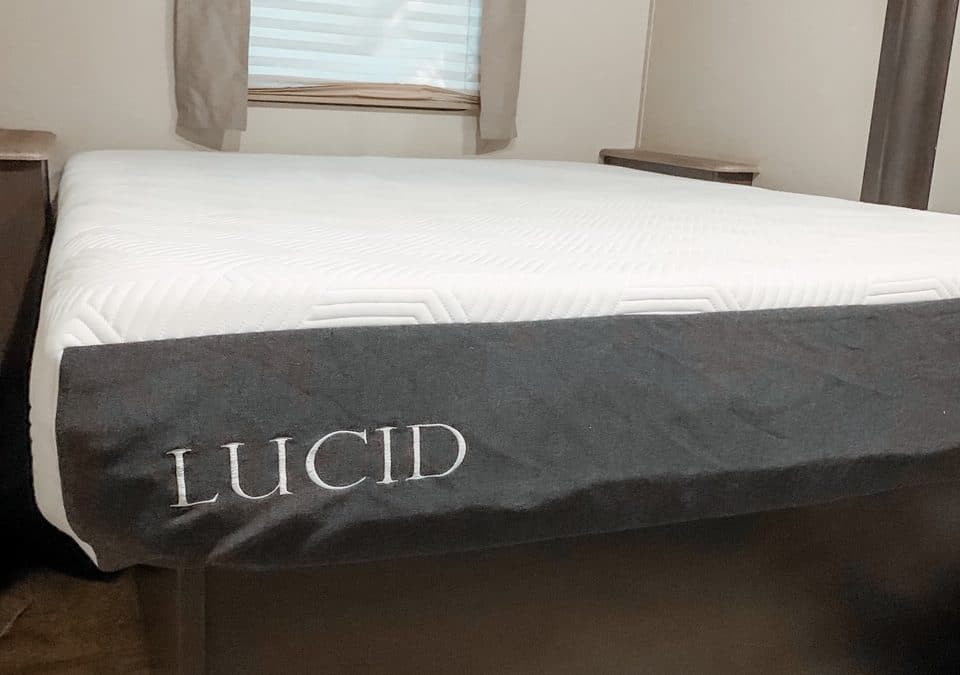
After some research and finding different options, we decided to purchase the Lucid Mattress from Amazon.

We chose the Lucid Memory Foam Mattress in a box because of its reviews and availability in the size we needed. Plus, it was Free Shipping with Amazon Prime. This helped make our decision easier.

Another positive about purchasing this bed is how easy it was to set up. It’s just like any other bed in a box.

This mattress came with an envelope cutter/opener to cut the plastic wrap around the bed and protect the mattress from getting cut. That was a nice surprise when opening the box.

Once the mattress was removed from the plastic, we unrolled it and laid it flat on the bed platform. We allowed about an hour for it to inflate before placing our sheets and blankets on top.

The Lucid Mattress has been one of our favorite and best purchases we have made for our RV Bedroom. Getting a good night’s sleep is so important to us and the Lucid Mattress is so comforting.

The memory foam works perfectly in adhering to our bodies for a comfortable night’s sleep. It’s like sleeping a cloud that forms for your body!

I honestly have yet to have any negatives with our purchase. So far, the bed has held up and is still as comfortable as the day we got it.

Also, the price is unbeatable. Other RV beds cost hundreds of dollars more than the Lucid Mattress.

View this post on Instagram


A post shared by Exploring New Sights | Blog (@exploringnewsights) on

2. Buy Quality Soft Sheets

In all honesty, I have wasted so much money trying to cut corners when it came to buying sheets.

There are so many options out there! It can become a bit overwhelming to purchase the perfect sheets when you don’t know any of the sheet lingo.

You have terms like; thread count, material, and woven pattern.

But what are the best and most comfortable sheets?

Well, just like mattresses have different comfort levels, so do sheets.

Now, when you search for sheets, the thread count is usually what many get hung upon. If you stay above 500 to 600 thread count, you’ll be good with softness, durability, and affordability.

In my opinion, however, it’s more about the quality of the material and woven pattern.

Also, you don’t have to spend a fortune on Egyptian cotton sheets, unless you want too, to get a good quality comfortable sheet set.

After many purchases, I know I will NEVER buy microfiber sheets again. The synthetic material is not comfortable or soft.

I found that 100% cotton sheets are the best. Also, a sateen woven pattern with more threads going vertical than horizontal is what we enjoy.

We recently purchased the Hotel Style, 600 Thread Count, in Grey from Walmart for like $50. It’s a set of one fitted sheet, one flat sheet, and two pillowcases. These sheets have been great for our RV Bedroom and didn’t break the bank!

Here is a set on Amazon that is like our purchase – > 600 Thread Count 100% Cotton Sheets – Soft and Silky Sateen Weave https://amzn.to/2PDGUzR

3. Down Comforter or Duvet

Grab a comfortable comforter set with matching decorative pillow-cases.

If you enjoy a lightweight quilt or duvet cover then go with what you enjoy sleeping with. The point is that you’re comfy!

We purchased this pretty and neutral crisp white comforter set for our RV Bedroom. It’s the perfect amount of warmth and comfort for a good night’s sleep.

When it comes to the perfect comforter set, search for your style! Whether it’s cabin plaid, black and white boho, or full of colors and patterns.

RV Bedroom Made up

4. Extra throw blanket

I love the look of an extra throw blanket on the bed.

They keep you warm and gives you something to take a quick nap with, without messing up the perfectly made RV bed. And, we all know how difficult those RV beds are to make up.

For us, we have a weighted blanket that we place at the end of our bed as our extra throw blanket. I love it because it stays in place and is super comfy to cover up with for nap time.

5. Comfy Pillows & A Throw Pillow 

You can decide if you want to add a nice throw pillow for character or not.

I would advise that if you do like decorative throw pillows, to keep them at a minimum in an RV bedroom.

There is not much room, to begin with, and trying to find a place to put decorative pillows when you sleep isn’t easy.

Plus, less is more!

We have 4 pillows, and 1 throw pillow to add extra coziness.

Also, make sure the standard pillows you choose are what you enjoy sleeping with. Whether that’s a flat pillow, a fluffy pillow, or a memory foam pillow.

Final Thoughts

Now that you know how to make your RV’s bed comfy and cozy to have a good night’s rest while you’re camping, get out there and camp!

Enjoy your RVing journey with restful nights. We absolutely love our Lucid Mattress, our budget-friendly soft sheets, and cozy pillows.

They make all the difference and I’m sure they will make the difference in your RV bedroom as well. If you found this article helpful, please feel free to share!

Also, if there is something you have found that makes your RV bedroom Comfy and Cozy, let us know in the comments below!

Don’t forget to follow us on Pinterest, Instagram, and Facebook!

Share this post and Pin for Later! 

RV Bedroom
RV mattress review
RV Internet: How we get internet in our RV (+Cell Boost)

RV Internet: How we get internet in our RV (+Cell Boost)

RV internet

Are you moving in to an RV and need Internet?

Maybe you are planning to travel in your RV, Bus, or Van and are desperate to find an afforable way to get internet.

Well, you’re not alone!

There are so many things in modern society that you need internet for. For example, if you like to stream your shows on Netlfix, Disney +, Hulu, and like to play video games or maybe you need it for work to stay connected and earn that income. If so, then having internet and great connection is a NECESSITY!

There are so many options out there that it can become overwhelming and frustrating to say the least.

I remember when we were trying to find the best internet for RVer’s. I was searching for an option that was reliable and didn’t cost us an arm and a leg.

After all, living in an RV was a chance for us to save money.

So, we went searching, read a ton of blogs on how others get their internet on the road. Some, however, were just way to expensive. Others didn’t provide us with the amount of speed and data that we needed. The first option we tried was the Verizon Jet Pack.

VERIZON JET PACK???

This option was recommened by many RVer’s. So, we signed up for it, received 15 gigs for like $100 a month. We used that 15 gigs in less than 3 days. Then it tethered horribly! We couldn’t even stream a show on Netflix or load a webpage on our laptop.

That was not going to work! I was frustrated and panicked. WE NEEDED INTERNET!!

Afterall, I had just been hired to work remotely for Avoya Travel as a Mastermind Assistant and I needed more data.

What were we going to do? I mean, we were already living in the RV.

So, I returned the device and got my money back for the Verizon Jet Pack.

THAT DIDN’T WORK…. SO, WHAT TO DO NEXT??

Then, one day I was speaking with my brother and he told me about a device from At&t that’s similar to a hotspot but it works like as another line on your data plan.

So, I started to do my research and found that I could purchase this device for $100 or set up a payment plan, and it would be added as another line on to our already existing plan for only $20 a month. We already had unlimited data with our phones, so it was a no brainer to just add another line.

The device we received is called the “Paramount Black”. It is considered one of their Wireless Internet devices. You can check out the link on our Resources page here. 

The device uses Cell Signal to provide you with WiFi, just like your phone uses Cell Signal when WIFI is unavailable. Therefore, if the cell service in certain areas is bad, chances are so is your WiFi connection.

This wasn’t a big issue for us because I knew there were great ways to get around that and boost cell signal.

WE NEEDED A CELL BOOSTER 

So, now that we had internet, we needed to make sure we were going to have great signal anywhere we went. Through all my research in searching for the Best internet for RVer’s, I noticed a lot of RVer’s purchasing the WeBoost Cell Signal package from Amazon.

After talking it over with my husband and recognizing our need to good cell service/wifi, purchasing the WeBoost Cell Signal booster was a done deal.

I mean, when you need Internet and good cell signal to earn an income, it becomes a necessity.

THE COMBINATION IS HEAVEN!

With the At&t Paramount Black and the WeBoost Cell Booster combined, we have great RV internet service. Currently we are in the rural area where getting signal can be scarce, however we have had no issues. It was the best combination of devices and it was so easy to set up!

Currently we run about 300 gigs a month between our two cell phones and the Paramount Black WiFi device. The internet costs us $20 a month as an additional line on our already existing cell phone plan! I am still so glad that I returned that Verizon (steal your money) Jet Pack.

If you’re considering purchasing a cell booster for your RV, the WeBoost is the way to go! It has paid for itself over the last two years we have used it. It is recommended, not only by us, but by so many other RVer’s! You can take a look at some of the reviews;

So, if you’re looking for an RV internet option and/or need to boost your cell signal on the road the “Paramount Black” from At&t is a great option and the WeBoost is highly recommended.


pin for later

Best Tents For Your DIY Glamping Trip

Best Tents For Your DIY Glamping Trip

Are you looking for the perfect Glamping tent to make your next camping trip comfortable and memorable?

Are you trying to figure out what the best tents out there are that are also affordable to create this memorable experience? 

If so, you’re probably looking for something that has great space and gives you the ability to stand up inside. After all, no one wants to feel cramped in a tent with barely any room to maneuver around or stand up. That to me doesn’t sound like a glamping experience.

The point of Glamping is to bring the modern comforts of home and civilization to the great outdoors.

If you have read my previous post on “how to DIY your own Glamping trip” then you know this is the first tip to create that glamping experience you desire. Having a larger tent, even if it’s only two people “glamping”, is important.

Let’s discuss our top best glamping tents that are affordable so you can begin creating your Perfect DIY Glamping Experience.

Cotton Canvas Bell Tent/Yurt by WhiteDuck

Reviews: 4.8 out of 5 stars (29 Reviews)

If you want to go all out and get the perfect Glamping Tent, then this is the ONE! It’s worth the money and can be used in all 4 seasons. It made out of 100% breathable cotton. You can fit 4 to 10 people comfortably in this tent.


CORE 9 Person Instant Cabin Tent

Reviews: 4.4 out of 5 stars (697 Reviews)

This tent is perfect for the Glamping experience because of the space it provides. It is 14 feet by 9 feet with a standing height of 78 inches. Large enough to fit two queen air mattresses comfortably. This option has Electrical Cord access that can be fully closed when not in use. The CORE 9 Person Instant Cabin takes about 60 seconds to set up, features room dividers, and wall storage pockets.

Where to buy: Amazon

CORE 10 Person Straight Wall Cabin Tent

Reviews: 4.2 out of 5 stars (97 reviews)

The CORE 10 Person tent is another great option like the CORE 9 person tent. This tent is a little bigger by having space for 1 more person as well as a taller standing center height of 86″. It comes complete with room dividers, front and back door access, as well as, storage pockets and electrical cord access. The CORE 10 person tent comes available in two colors, orange, and maroon.

Where to buy: Amazon 

GigaTent 8 Person Family Tent

Reviews: 5 Stars (3 reviews)

This option is fantastic! It fits 8 people comfortably which is great because if there’s only two of you going “Glamping” there will be plenty of room to create that DIY Glamping experience. The walls are almost completely vertical with access points and 6 windows to allow a nice cool breeze through space. It is created with heavy-duty waterproof material to keep the rain out if you ever get caught camping during a storm. This company also carries a “Satisfaction Guaranteed” policy!

Where to Buy: Amazon

Coleman Tent Weathermaster 10

Reviews: 4 out of 5 stars (1,582 reviews)

The Coleman Weathermaster gives you 2 options. You can choose the 6 person tent or a 10 person tent. Either one, they are great options to give you space so you can DIY your own Glamping Trip. Coleman is a huge name in camping products, so you can’t go wrong with this brand. This ten is easily set up in 20 minutes with a standing height of 6 feet and 8 inches! The Coleman Weathermaster is equipped with Colemans WeatherTec Patented welded floors for you dry throughout your whole Glamping experience.

Where to Buy: Amazon

Tahoe Gear Bighorn XL 12 Person Teepee Cone Shape Camping Tent

Reviews: 4.1 out of 5 stars (20 reviews)

If you’re looking for that Teepee style for your DIY Glamping experience than this tent is a great option. It is 18×18 and can fit up to 12 people comfortably. Due to the cone shape design, it can handle up to 35 mph winds, is completely waterproof and allows the water during a rainstorm to roll right off the tent and no accumulate on top of the tent. The Tahoe Gear Bighorn has 4-floor vents that can be adjusted and fully closed as well as a ventilated to help eliminate humidity inside the tent.

Where to Buy: Amazon

Winterial Teepee Tent

Reviews: 4 out of 5 stars (36 reviews)

Here is another great option that gives you the Teepee Glamping experience you desire. This tent is durable, only weights 15lbs, and can be set up in less than 5 minutes. You fit 6 to 7 people comfortably so it is great for friends and family. Of course, this tent is waterproof made with 210T polyester. The tallest point of the tent is 10 feet so it allows a lot of standing room.

Where to Buy: Amazon

Happybuy Bell Tent

If you really want the Glamping experience, you can’t go wrong with this Canvas Yurt Tent. It is great for Camping, Hunting, or any other outdoor events, plus it is 4 season tent that you can add a stove into if you happen to be camping in the winter. It is also waterproof, firm, and stable with strong steel center poles, galvanized frame tunes. and nylon rope for tie-downs. This option can fit up to 12 people comfortably.

Where to Buy: Amazon

Creating your first DIY Glamping experience should always start with the best glamping tent and open spaces. These glamping tent options are fantastic to get you started and enjoy camping. Having space to stand up, sleep, add in your gear is essential.

I love these options because they are affordable, durable, and waterproof! You can’t go wrong with any one of them!

I hope you enjoy your DIY Glamping trip and get the most out of the outdoors without sacrificing some comforts of modern life. If you haven’t already head over to our previous post “How to DIY your own Glamping Trip” for more ideas.

Thanks for stopping by! Please share, tweet, and pin!

Pin Me to save for later!

RV Remodel : How To Use TIC TAC TILE To Upgrade Your RV Kitchen

RV Remodel : How To Use TIC TAC TILE To Upgrade Your RV Kitchen

Are you looking to do an RV Remodel to your home on wheels?

Are you checking out all the Instagram and Pinterest boards with beautiful remodels and dreaming about creating your own amazing space in your RV?

Well, you’re in the right place!

Before we even purchased our RV I knew I wanted to make my own modifications and do a little remodeling to make it fit our style. The main reason is that a lot of the RV’s are very “brown” and out of date.

If you’re like me you probably loved seeing all the amazing RVer’s that have transformed their kitchens on social media. Seeing these kitchens fueled my desire to transform ours and I hope it’s fueled your desire as well!

During my dreaming stage of an RV remodel, I noticed one modification many were completing in their kitchens was adding tile for a backsplash.

This is the first thing we did to add our own style into the space, and we have absolutley no regrets! It brings an incredible feeling of uniqueness and character to our kitchen.

After I decided that tile was what I wanted to do first, I began my search for the perfect lightweight stick on option that didn’t require all the fancy grout and plaster. I needed something quick and easy, something that would make a nice design statement. I also didn’t want to spend too much money because I was on a budget.

I searched through Home Depot, Lowes, and online. Through my research, I found a company and a product called TIC TAC TILE. Of course, I am a review type of buyer. If the reviews are not good, then I continue looking for another product. I always make sure I look at the negative and positive reviews.

What I found was that the reviews were mostly positive. The bad reviews couldn’t outweigh the good ones in my opinion. Plus the price was reasonable, compared to other brands that I found.

I was overwhelmingly excited to start the remodel on our kitchen! Something I had been dreaming of before we even purchased the RV. These tiles seemed like the perfect place to start.

Therefore, I decided to go forward with the TIC TAC TILE and ordered them directly off Amazon. They had the best price and fast shipping with Amazon Prime.

How to apply?

To start the RV remodel with TIC TAC TILE, let me be the first to say that the application is pretty easy. However, having patience and precision is key to making it look amazing. Here is a step by step on exactly what I did to apply my TIC TAC TILE.

  1. Clean —-> Cleaned the wall surface with a plain disinfectant wipe. You can also use white vinegar, TSP, or whatever kind of cleaning product that is multi-surface and has a degreaser.
  2. Dry —-> Make sure the wall is completely dry!! This is important. The sticky adhesive does not stick to any wet surfaces.
  3. Measure —-> Now when starting out you can get away with just adding an entire page of the tile, however, once you start to get around edges and windows, measuring is important.
  4. Cut —-> Once you’ve measured, now is time to trim the pieces to the desired/needed size. For cutting, I found after using scissors, that a box cutter and cutting board made the perfect tool. The box cutter is more precise and sharper when getting through the tile, adhesive, and the adhesive protectant.
  5. Stick —-> Now, remove the backing of the TIC TAC TILE that protects the adhesive. Then stick the tile on the wall to the desired position. It’s might take a few tries to get the hang of it and get it perfectly lined up.
  6. Repeat —-> Just go ahead and repeat steps 1 through 5 until the job is completed to your satisfaction.

Positives:

This product adds character to your RV with minimal prep. The product is heat and mold resistant, lightweight, and perfect for the kitchens and bathrooms in any recreational vehicle.

TIC TAC TILE is also very affordable and Eco-friendly! The material is very easy to clean after oil or splattered food from cooking gets on the tile.

Negatives:

Many have complained about the adhesive not sticking all the way and corners coming off the walls. However, there are steps to take to prevent this. Such as cleaning the area properly and adding your own additional adhesive to the edges.

I would also avoid applying the product while in extreme heat or humidity to allow the adhesive to stick properly. It is tedious work, so having patience while applying the product is important.

Where to buy?

As I mentioned, Amazon is the place I purchased our TIC TAC TILE. You can choose from a variety of colors and styles. We chose the classic white Subway tile look with the grey grout.

There are available as 12 x 12 sheets and you can either purchase 1 sheet, 5 sheets, or 10 sheets. I purchased the 3 of the 10 sheet packs to complete the kitchen and bathroom. I do have leftover tile, which I am okay with because I would rather have too much than not enough.

If you are thinking about changing things up a bit in your home on wheels with a little RV remodel then TIC TAC TILE is a great place to start!

We absolutely love the look and feel in our Kitchen now! It adds our own touch and flair to the space. Plus, our RV is no longer the cookie-cutter décor with the brown boring interior. 

The TIC TAC TILE also made the kitchen area feel like its own little corner by separating it from the rest of the RV’s décor. It almost feels like you get a new kitchen by adding the simple tile.

So, if you’re looking for a budget friendly way to add some flair and personality to your home on wheels then I definitely recommend TIC TAC TILE!

Have you used TIC TAC TILE in your RV? I would love to know what you think about it! Leave a comment below and share with anyone looking to make some transformations to their home on wheels!

Thanks for stopping by!


Pin Me to save for later!

Sign up today for our monthly newsletter!

You have Successfully Subscribed!

Pin It on Pinterest